The toilet flushing valve is the key to a properly working toilet in any modern bathroom, but most people do not know what the core of the flushing system is. It could be a weak flush or an endless flowing stream of water, or a total malfunction. Knowing how to install or change a flushing valve may save some time, money and frustration. We will take you through the entire process of installing a toilet flushing valve, we will tell you what it does and we will also recommend the best-rated toilet flush valve to install, in both one-piece toilet flush valve systems and single-piece toilet flush valve systems.
What Is a Toilet Flushing Valve and Why Does It Matter
We should first know what a flush valve on a toilet is before we get down to installation.
One of the most important parts that are within your toilet tank is the toilet flush valve, which regulates the amount of water that gets released when you flush. Once you press the flush button or handle, the flush valve opens and the water rushes out of the tank and into the bow,l clearing the waste and then filling the system again so that it can be used again. With time, the wear of the flush valve can be in terms of mineral deposition, cracks or damaged seals leading to leakages or underperformance.
Selecting the best toilet flush valve that fits your model of toilets and provides a good flushing effect means that it will perform well and will save you time in using water.

Tools and Materials You’ll Need
To make the job easier, assemble the following tools and materials before beginning the process of the installation:
- Adjustable wrench
- Screwdrivers (Phillips and flathead)
- Bucket or container
- Sponge or towels (to take off the remaining water)
- Replacement toilet flush valve (be sure you have the correct valve with the correct toilet type)
- Plumber’s tape
Being prepared in advance by having the right tools with you also prevents wastage of time and makes the process more effective.
Step-by-Step Guide: Installing a Toilet Flushing Valve
The steps listed below are followed when replacing or installing a new toilet flushing valve. These directions presuppose that you are changing the valve in a gravity-fed tank system – the most common one in a residential bathroom.
1. Turn Off the Water Supply
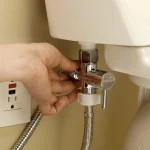
The initial and most vital one is to ensure that you switch off the water supply to your toilet. Find the shut-off valve on the back side or the bottom of the toilet and turn it clockwise until it completes. This blocks the flow of water and avoids leakage during the work. After closing, flush the toilet to remove the major part of the water in the tank and wipe the rest down using a sponge or towel.
This process would give a clean and dry work environment which minimizes chances of spillage.
2. Remove the Tank Lid and Disconnect Internal Components
Gently remove the lid of the toilet tank and place it somewhere safe. Then, un screw the flush handle or button connection and the refill tube until the flush mechanism is dislodged. In any case, you do not necessarily have to take the tank off when your toilet is a one-piece toilet flush valve setup, although you do have to dismantle all of the internal components.
Go easy here; the tank lid is light and may break readily when it falls.
3. Disconnect the Water Supply Line
Loosen the nut between the water supply line and the fill valve of the toilet using a flexible wrench. Put a bucket or a container below in case of any dry water that might drip out.
This will enable you to completely unplug the tank (where necessary) in later stages.

4. Remove the Old Flush Valve
In cases where your toilet has a removable tank, then you will have to remove the tank off the bowl to be able to reach the flush valve. Apply a screwdriver and wrench to unscrew the bolts attaching the tank to the bowl then proceed to remove the tank carefully and place it on a towel. After opening it up, find the big locknut of the bottom of the tank containing the flush valve and loosen it. Take out the old valve assembly in the tank.
With toilets where the tank need not be removed, all that should be done is to unthread the flush valve inside the tank and pull it out.
5. Prepare the New Flush Valve
Test Before installing the new flushing valve, make sure it is clean and prepared to install. Install the proper rubber washer or seal (supplied with the majority of kits) over the bottom of the valve to avoid leaks. When you are changing the flush valve and the seal, it would be a good idea to buy a quality kit and lessen the difficulties later. Most of the highest rated toilet flush valves are provided with convenient installation characteristics with strong gaskets.
6. Install the New Flush Valve
Install the new flush valve into the tank positioning the overflow tube to the proper position and facing the fill valve. Starting on the under side, screw in the locknut or fastener and screw it tight with the fingers, then a quarter-turn with a wrench (if necessary). Do not overtighten because the porcelain tanks may crack when pressure is too much.
Ensure that the valve is fixed in position and firmly, this will ascertain a watertight seal.
7. Reassemble the Toilet
Assuming you took out the tank in Step 4, this is the time to put it back. Fit the tank bolt holes with the bowl holes, and insert the bolts and hand tighten the nuts. Tighten on either side alternately to maintain the level of the tank. Reconnect the water supply line and reconnect the refill tube and flush handle linkage.
This process will be less complex in single piece toilet flush valve designs because the bowl and tank are already joined together in one piece.
8. Turn On the Water and Test
Turn the shut-off valve to the counter clockwise side and allow the tank to fill. After filling up, flush the toilet a few times to make the new valve run well and experience no leaks around the joints. Adjust the chain tension or flapper seating, as needed, to enhance performance.
This last test will ensure that your installation is complete and that your toilet is available to use.

How to Choose the Best Toilet Flush Valve
Not every flush valve is created the same way and the choice of one can affect the efficiency and life of your toilet. The following are some of the things to consider:
- Style of the valve: All types of residential toilets have gravity-fed flush valves with a flapper or canister. Dual-flush models provide water efficiency by providing liquid or solid waste choices.
- Fit Compatibility: The valve must fit your toilet flush, particularly if you have a one-piece toilet flush valve or a certain brand set up.
- Durability: seek valves of corrosion-resistant materials and of a strong seal. They will normally last longer than the low-cost substitutes.
- Ratings and Reviews: Enquire of best rated toilet flush valve available in the market that is suggested by professionals or view user reviews to determine the performance and long life.
With a wise choice, you will minimize the maintenance requirements and improve the overall performance of your toilet.

Upgrade Your Bathroom with Premium Solutions from Ortonbaths
When it comes to combining innovation, elegance, and long-lasting performance, Ortonbaths stands out as a trusted name in modern bathroom solutions. Whether you’re replacing a flush valve or planning a complete bathroom upgrade, Orton Baths offers premium sanitaryware designed for efficiency, durability, and contemporary aesthetics.
Why Choose Ortonbaths?
- High-Performance Flushing Systems: Engineered for powerful, water-efficient flushing with advanced flush valve technology.
- Premium One-Piece & Wall-Hung Toilets: Sleek, space-saving designs that enhance modern bathrooms.
- Durable & Corrosion-Resistant Materials: Built for long-lasting reliability and minimal maintenance.
- Water-Saving Dual-Flush Options: Eco-friendly designs that reduce water consumption without compromising performance.
- Contemporary Aesthetic Appeal: Elegant finishes that complement both classic and modern interiors.
If you’re installing or upgrading a toilet flushing valve, choosing a quality system from Orton Baths ensures smoother operation, reduced leakage risks, and enhanced bathroom comfort. Designed with precision and built to last, their bathroom solutions deliver both functionality and style making them a smart investment for any home.
Explore refined bathroom innovation with Orton Baths and experience performance you can rely on.
Conclusion
At first glance, it may appear that it takes a lot of tools and specific step-by-step instructions to install a Toilet Flushing Valve, but with the appropriate tools and understandable instructions, it is an undertaking that many homeowners can feel reasonably comfortable with. You may be installing a best toilet flush valve or replacing an old one in one piece toilet flush valve system, but this guide will provide all the information you require to know, such as how to turn off the water and how to verify that you have installed your newly installed valve. When installed and well-maintained, you will have a well-run toilet that will serve you well and efficiently over the years to come.
At any point, though you are unsure, do not hesitate to seek the advice of a plumbing expert, particularly regarding complicated toilets or odd designs, to be safe and to perform best.