


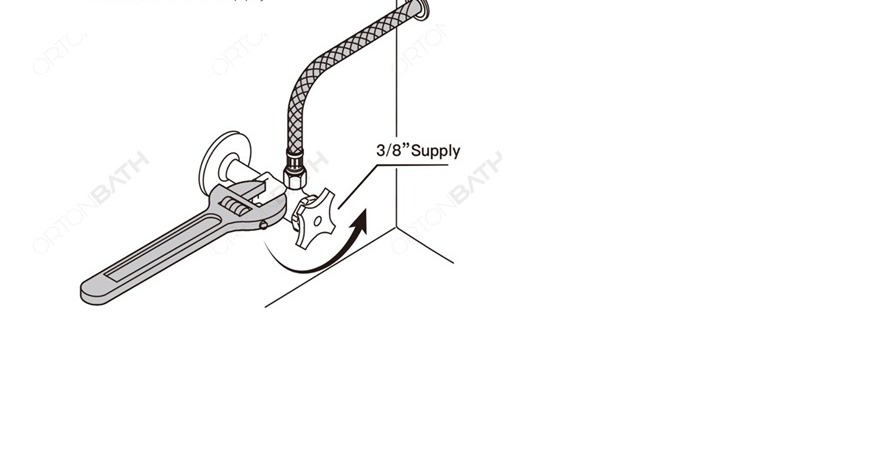
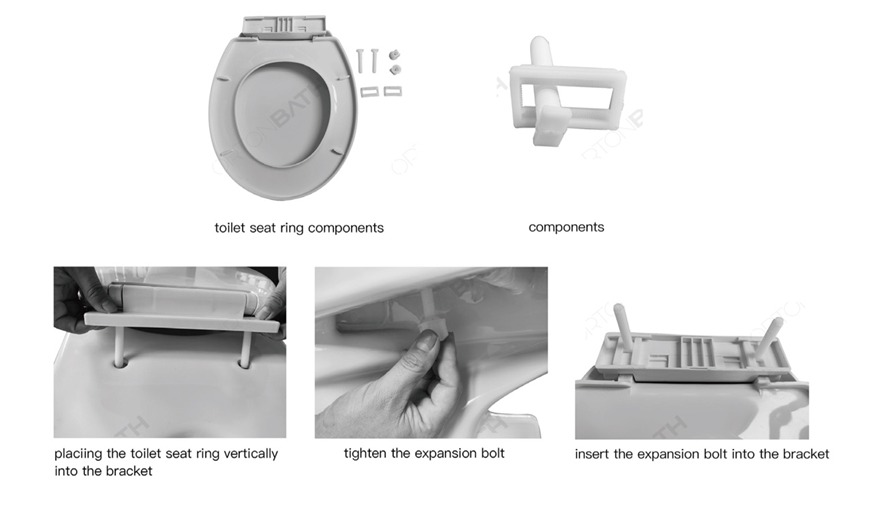
Thread the supply hose onto the tank.
Two optional filling
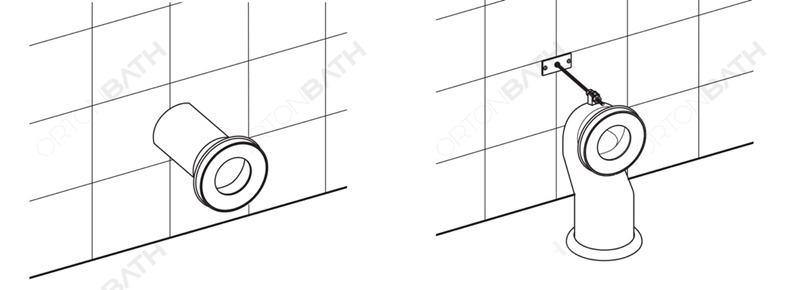
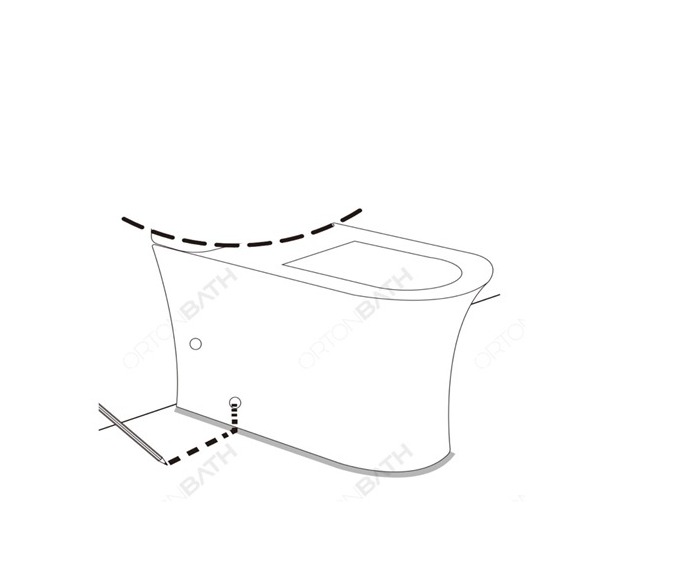
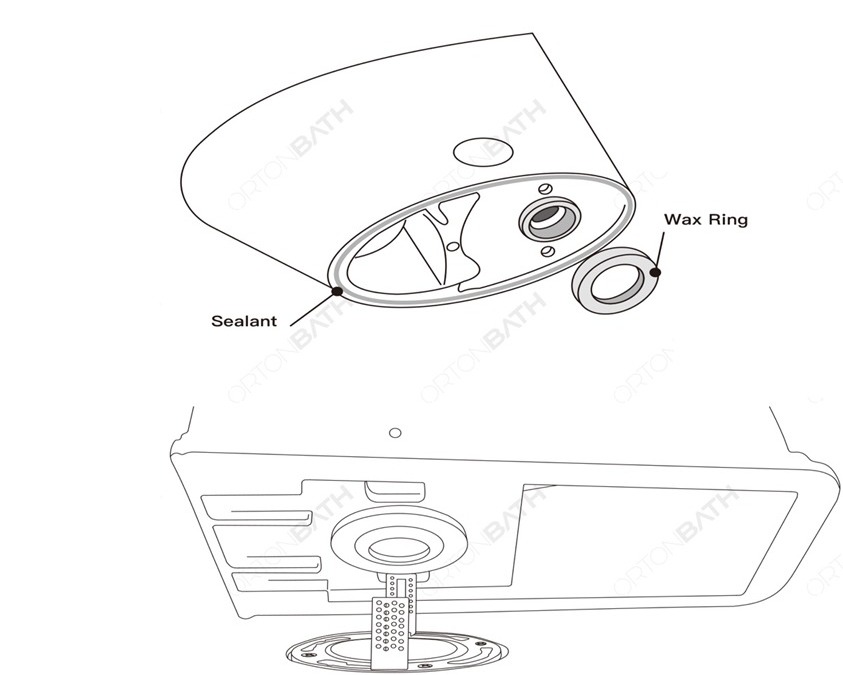
Optional
Connect Water Supply
· Flush several times and check for leaks
ORTONBATH® products are made with quality materials and excellent craftsmanship to provide our customers with beautiful, durable, long-lasting products. Should there be any defects in materials or craftsmanship under regular use that are discovered within the first year of installation, ORTONBATH® will provide replacement parts at no charge, or at its discretion, replace any product or part of the product that is deemed defective, under normal installation, use, service or maintenance. This warranty applies only to the original purchaser. Proof of purchase will be required in the instance of a claim.
ORTONBATH® recommends all installations of ORTONBATH® products to be conducted by a licensed, professional plumber or contractor. ORTONBATH® will not be held responsible for any damage or product failure due to improper installation, misuse, or failure to utilize a licensed professional for installation. ORTONBATH® is not responsible for any installation or removal costs.
This One Year Limited Warranty Will Be Voided If:
ORTONBATH® makes no implication that its products comply with any local building or plumbing codes. It is the consumer’s responsibility and obligation to determine local code compliance prior to and during installation. This warranty extends only to the original purchaser and first consumer.
ORTONBATH® is not responsible for any special, incidental or consequential damages associated with the installation, replacement, return or use of the original purchaser’s product. This includes, but is not limited to: freight costs, labor, travel time, lost profit, home damages and other contingent liabilities and costs (including, without limitation, costs associated with ‘professionals’ or ‘experts’, investigations, audits, analyses, attorneys and any other professional/ hired services).
The ORTONBATH® warranty is a comprehensive and explicit limit of liability. All items not disclosed within the warranty are not addressable within the responsibility of ORTONBATH® . Certain states have variances regarding implied warranties; in those situations, we remain fully compliant.
WARNING: Contents of your order may contain sharp and possibly other harmful pieces and may cause hazard to children and adults. ORTONBATH® is not responsible in any way for personal dam- ages.
Must Visit:https://ortonbaths.com/siphonic-vs-washdown-toilet-better/
Must Visit:https://ortonbaths.com/difference-between-uf-vs-pp-toilet-seat-cover/
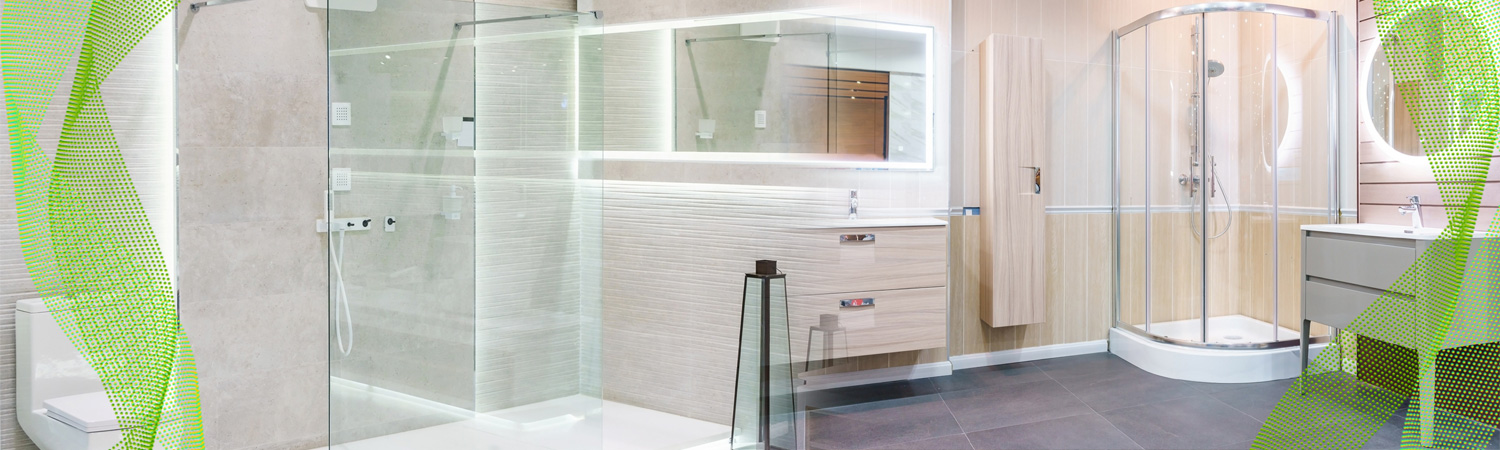
Glass shower doors are a perfect completion to a tiled shower enclosure, offering a more attractive and effective water containment than a traditional shower curtain and rod. Glass doors can be clear or frosted for privacy, and there is a range of track finishes to match almost any bathroom décor.
Step 1
Clean the tile surface with a household cleaner to remove any film or dirt from the tub ledge and tile surfaces where the frame of the shower door is to be installed.
Step 2
Measure the inside width of the shower at the top surface of the tub ledge, from wall to wall. Mark this dimension on the bottom track piece of the shower door frame.
Step 3
Use a hacksaw to cut the bottom track piece to the length determined in Step 2. Use a metal file to smooth any rough edges from the cut. Also use the file to ease the lower corners at the ends, if necessary to allow the track piece to fit firmly flat on top of the tub ledge. Important: Make certain the deeper door channels are facing up before marking and making any modification to the track corners.
Step 4
Place the bottom track piece on top of the tub ledge, centring it on the flattest portion of the ledge surface. Measure the distance to the edge of the tub ledge to confirm the track is centred, then use masking tape to temporarily secure the track in position. Tape both ends, the middle and along the track as needed to hold it firmly in place. Use a soft-lead pencil to draw a line along the front edge of the track on the tub ledge.
Step 5
Position the right-side vertical frame piece against the right wall, slipping the lower end into the bottom track. Make certain the side-frame piece fits down fully into the bottom track. Use a metal file to ease the lower corners of the track slightly, if necessary to get a tight fit into the lower corner where the tub ledge and the wall tile meet.
Step 6
Use a level to hold the frame piece plumb. Mark the screw holes in the track on the tile surface with a pencil. Set the vertical track piece aside.
Step 7
Repeat Steps 5 and 6 for the left-side vertical side frame piece.
Step 8
Center-punch the screw hole locations marked in Steps 6 and 7, using a hammer and a nail set. It is only necessary to nick the tile glazing slightly as a pilot point for the holes.
Step 9
Use an electric drill with a 3/16-inch masonry or tile-cutting bit to slowly drill out each screw hole. Surface chipping can be minimized by placing a small piece of masking tape over the mark before drilling. After drilling the hole, use a hammer to tap plastic screw anchors into each hole.
Step 10
Remove the tape holding the bottom track in place. Turn the track over and run a 1/2-inch bead of silicone caulk in its front and rear channels. Keep the bead slightly higher than the depth of the channel flanges.
Step 11
Place the bottom track in position, aligned with the pencil lines marked in Step 4, and press it down flat on the tub ledge surface.
Step 12
Run a 1/2-inch bead of silicone caulk in the front and rear channels of the right-side vertical frame piece. Keep the bead slightly higher than the depth of the channel flanges.
Step 13
Position the right-side vertical frame piece in place, inserting the lower end into the bottom track. Make certain not to move the lower track out of alignment with the pencil lines you made on the tub ledge. Align the side track with the screw anchors installed in Step 9. Use a Phillips screwdriver to insert the screws provided with the track into each anchor location. Tighten them until the track is held firmly against the tile wall surface.
Step 14
Repeat Steps 12 and 13 for the left-side vertical door frame.
Step 15
Measure the inside width of the shower at the top of the two vertical door frame pieces, from wall to wall. Mark this dimension on the top door track piece of the shower door frame.
Step 16
Use a hacksaw to cut the top track piece to the length determined in Step 2. Use a metal file to smooth any rough edges from the cutting.
Step 17
Insert the top door track piece into position. Secure to the vertical side track pieces with the screws provided, inserting the screws through the predrilled holes at both ends of the track.
Step 18
Install the inside door by slipping the top of the door panel into the upper inside channel, then swinging the bottom of the door panel into the lower inside track. Position the inside door panel against the vertical wall frame nearest the showerhead. Install the plastic panel guide into the bottom track, just behind the inside vertical edge of the door. Secure the guide in place with the screws provided.
Step 19
Repeat Step 18 to install the outer shower door panel into the outer door channel, with the towel bar/handle facing outward.
Step 20
Install the door bumpers in the vertical track channels by snapping the bumper tabs into the predrilled holes in the channels.
Step 21
Apply a 1/8-inch bead of silicone caulk around the outside and inside of the door frame where the frame meets the tile and tub ledge surface. Allow the caulk to cure for a minimum of 24 hours before exposing it to moisture.
Must Check:https://ortonbaths.com/the-drawbacks-of-a-two-piece-toilet/
Must Check:https://ortonbaths.com/the-significance-of-wc-in-european-toilet-terminology/
WhatsApp us